How To Manage Storage Spaces and Storage Pools in Windows Server 2012
Microsoft delivered a completely new way of looking at our disks and storage in Windows Server 2012, with the biggest change in how storage is laid out and provisioned. Here’s how to create and manage it all.
Windows Server 2008 R2 used the traditional disk management MMC snap-in to manage the disk configuration, as well as the handy DISKPART command-line tool. It is fair to say that the storage subsystem was not exactly optimized for high speed, resilience or large-scale file server operations. So when the Windows Server team designed the new Windows Server 2012, they took a long hard look at storage.
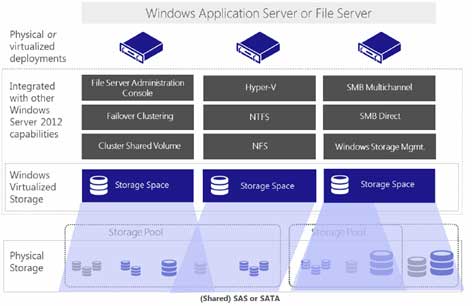
The solution that Microsoft delivered is a completely new way of looking at our disks and storage in Windows Server 2012, with raft of changes in the storage arena. These include SMB 3.0, which opens up a number of exciting new possibilities. The biggest change, though, has been reserved for the layout and provision of the storage itself. The introduction of storage spaces bring with it the ability to provide clustering for high availability and integration with Cluster Shared Volumes for scalable deployments of virtual machines, file shares and other workloads.
Storage Spaces lets you group industry-standard disks into at least one storage pool. You can then create virtual disks from the available capacity. One of the most useful add-ons when using this technology is that you can thin provision a pool and it can grow as needed.
How Microsoft Achieves All This Disk Trickery
The concept of a storage pool and a Storage Space is based on taking a bunch of physical disks and creating a virtual single pool of space. This pool is then used to create volumes for our use. Clever!
 |
|
(Click image to view larger version.) |
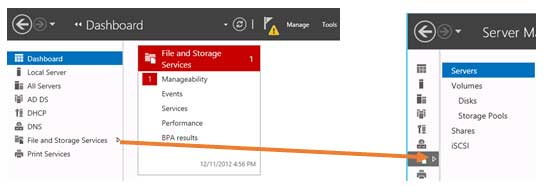
File and storage services is one of the 18 roles within Windows Server 2012 and requires nothing other than a working installation. The server can be a full GUI or the Server Core version. The storage subsystem can be controlled locally, remotely through a GUI or by PowerShell cmdlets:
 |
|
(Click image to view larger version.) |
Server Manager is the place to manage the role. Clicking File and Storage Services opens up the individual management areas:
 |
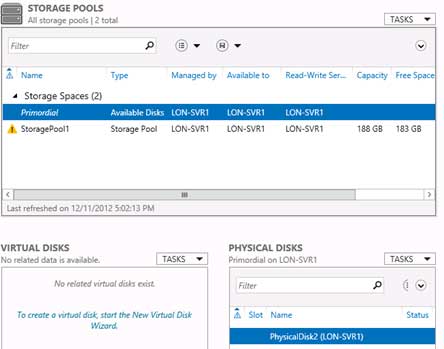
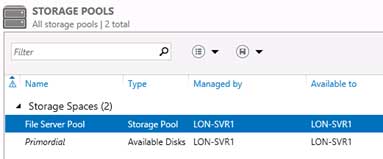
Storage Pools shows the individual storage spaces you have created on the local server or have access to on a remote server. The “primordial” space refers to any physical disks added to the server but not yet added to a storage space. Adding a disk wipes all data from it.
The full pool screen shows details about the storage spaces and the constituent physical disks, as well as any virtual disks already created on it:
 |
|
(Click image to view larger version.) |
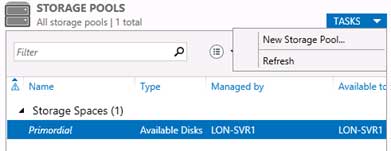
To create a new pool, simply click Tasks then Create New Storage Pool to fire up the wizard:
 |
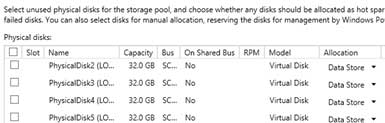
Choose the physicals disks you want to be part of the pool:
 |
The pool shows up. Note that if you use all physical disks, the primordial space will disappear:
 |
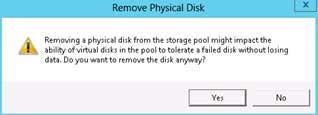
You can remove an individual disk from a pool, but this creates a warning about data loss:
 |
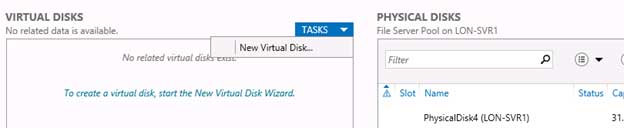
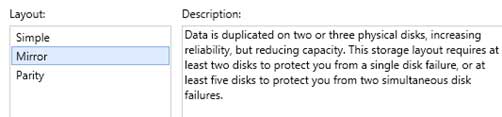
Having created a pool, the next task is to create a virtual disk on which to create our volume. I will create a three-way mirrored disk, although my choices are from simple spanning (or JBOD), Parity (three disks needed) or two- or three-way mirroring (three-way requires at least five disks):
 |
|
(Click image to view larger version.) |
Choose resilience type:
 |
|
(Click image to view larger version.) |
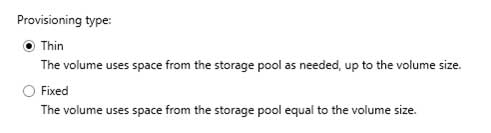
Choose provisioning type:
 |
|
(Click image to view larger version.) |
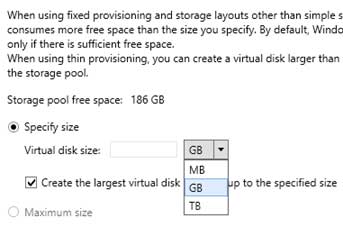
Choose a disk size:
 |
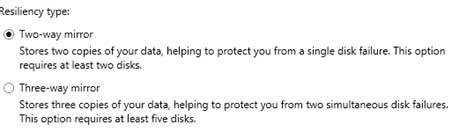
Choose two- or three-way mirroring:
 |
|
(Click image to view larger version.) |
On completion, the wizard creates the mirror:
 |
|
(Click image to view larger version.) |
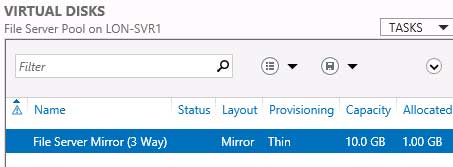
Note that although I created a 10GB three-way mirror, only 1GB is allocated at present (thin provisioning). As data is saved, the allocation will increase accordingly:
 |
|
(Click image to view larger version.) |
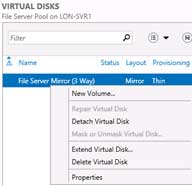
The final step is to create a usable volume on this mirror. This could be a mount point or a drive letter. A new wizard is required.
Right-click the new mirrored virtual disk, then select New Volume. Without this, the storage we just created will not be accessible to the operating system or users:
 |
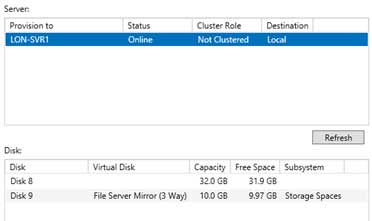
Choose the correct disk (physical or virtual on which you wish to create a volume — note all unallocated physical disks will appear here as well as virtual ones):
 |
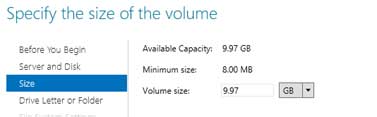
Choose the volume size, up to the full size of the virtual disk you created:
 |
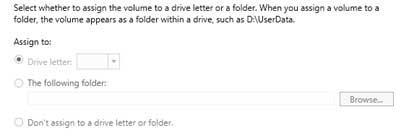
Decide whether the user is going to see a new drive letter or whether you wish to use this volume as a mount point in an empty NTFS folder on another volume:
 |
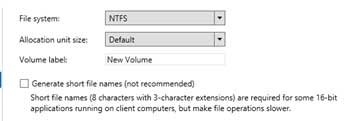
Choose the format of the file system. Options include NTFS and the new Resilient File System:
 |
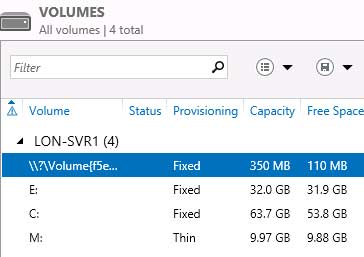
The chosen drive letter now appears in your list of volumes available. Note it is shown as thinly provisioned:
 |
In summary
Microsoft has now given us a tool that has huge implications for our local and centralized storage on servers. Small businesses that cannot stretch to Fibre Channel or iSCSI implementations can now provision scalable, resilient systems for clustering, file servers and application usage. All this can be achieved out of the box, with industry-standard cheap storage hardware.
The Mirror and Parity resilience types are pseudo-RAID and will apparently recover even in a totally unrelated system and will auto-recover on a local server when new storage is added. Despite this, I would still only ever trust my data to hardware implemented RAID and then place that in a storage pool — some habits die hard.
The Storage Spaces and storage pool feature within Windows Server is a huge leap forward in Windows Server usability.
About the Author
Ed Baker, MCSE, MCT, is a 20-year IT veteran who specializes in Windows server and client products. Ed teaches for Firebrand Training and the Firebrand Microsoft IT Academy Programme in the UK.
Source: Cluster Shared Volumes (CSV) – Extending a Volume
There are often times where you have a need to expand a LUN when running enterprise systems. This is a trivial action in most cases because you simply add physical drives to the array and then use Disk Management to extend the drive to encompass the newly expanded volume. Unfortunately, on highly-available systems such as those running Failover Clustering with Cluster Shared Volumes (CSV)-enabled features the drive is reserved and un-manageable by Disk Management. However, this procedure is possible and capable of being done without any loss of service to client services such as virtual machines.
First: Extend LUN using OEM-specific tools
The first step isn’t one that I can document specifically because it is OEM-specific for the toolset. As you know, SAN’s are a form of Shared I/O and due to this they are managed using a set of proprietary tools (usually) and as such I can’t really provide guidance because of this.
However, to summarize a bit what you should do is similar to the following steps as I performed on our EMC Clarion AX4-5 using Navisphere Express –
- Connect to Navisphere via browser
- Click Disk Pools
- Click Extend
- Provided percentage or size
After extending the LUN, I verified that the LUN was fully extended through the Navisphere client and when completed, I moved to the next step.
Second: Find the CSV Owner
To find the owner of the CSV, the easiest method is to use the Failover Clustering administration tool. This can be found on any of the cluster hosts or you can install on your workstation as part of the Remote Administration Tools for Windows 2008 R2.
To determine the CSV owner, do the following:
- Click Start, Administrative Tools, Failover Cluster Manager
- Connect to the Cluster by clicking Manage Cluster from the MMC action pane
- Highlight the Cluster Shared Volumes node, and locate the server name under Current Owner

This server name will be used in Step 3.
Third: Remote Desktop (RDP) to CSV Owner Server
CSV’s are a tricky “volume” unlike many seen in the past. The entire LUN is presented to all hosts in the cluster; however, the lock for each server is done at the folder level rather than the traditional LUN level. This allows n number of hosts to all connect to a LUN but only own the applications contained in the folders they utilize. Beyond that, the drives that are managed in Disk Management are set as reserved and un-manageable using the UI hence causing trickiness. Using the information determined in Step 2, let’s RDP to the server.
To RDP to the server, just use mstsc /v:{server FQDN}
Fourth: Use DiskPart to Extend Volume
The last step, now that you are at the server who owns the CSV, is to execute DiskPart and issue the command to start the extend process. To do this, you do the following –
- Run DiskPart from an elevated command prompt
- Type rescan
- Type list volume
- Type select volume {enter volume number from output from #3 step}
- Type extend
To confirm that all changes were taken and that the volume is the correct size, you can do the the list volume command again and verify the size change from step 3 above.
Summary
In this post, we focused on a scenario where you’ve “outgrown” your planned capacity and you now need to extend your CSV-based volume. Unfortunately, the traditional methods of extending the size of a drive isn’t capable of being used due to the tools (Disk Management) disabling the functionality. The next challenge, though, is finding the volume with DiskPart and the trick here is to find the CSV owner and execute the toolset from this server. After doing this, your LUN should extend to the size you provisioned in your OEM-specific tool.
Thanks,
It is fully supported to extend a Windows Disk ONLINE as of Windows 2008
Microsoft CSS team have recently updated KB304736 to explicitly confirm and support online disk extension on Windows 2008 and Windows 2008 R2. In many cases online Windows extension will also work on Windows 2003 Service Pack 2 x64 Edition.
Here is a summary of the capabilities of Windows 2008 or higher
- Both Local disks and Shared Cluster disks can be extended Online
- Almost every modern SAN supports extending LUNs online, allocating this new space at the end of the disk and presenting this information to Windows
- The word “Online” means that the end-to-end service is preserved. A disk may be extended with the cluster running, SAP & SQL Server running and on the system is on high load. There is no necessity to wait for a period of low activity, though some customers choose to time such operations off peak
- Windows supports several kinds of disks. MBR Disks are limited to 2TB in size. In general GPT disks are recommended.
- Both Basic Disks and Dynamic Disks can be extended online. Dynamic Disks are not supported in a Windows Cluster, but there is no real use for Dynamic Disks with SQL Server Clusters. This blog explains the background on Basic and Dynamic Disks.
- Windows 2008 & Windows 2008 R2 offer a simple way to extend a disk through the Disk Management GUI. A command line tool diskpart.exe can also be used
- Windows allows for both extending and shrinking a disk (though we seldom find customers who need to shrink disks)
Windows 2003 based systems can usually extend a disk online. Extending a disk on Windows 2003 needs testing prior to executing in a production environment. This is because of the age of the Windows 2003 product and the fact not all drivers and components support online disk extension. It is best to check with the SAN vendor and/or to test with the applications shutdown first.
2003 OS storage expansion in clustered setup
Source: Extending cluster storage
A question recently came in on the bloghotline from a customer who asked about implementing scalable storage on server clusters and how to avoid downtime when storage needs to be extended. One of our cluster PMs, Elden Christensen, replied as follows:
. . . . . . . . . . . . . . . . . .
In regards to the ability to dynamically increase volume sizes to eliminate downtime, this can be accomplished today on Windows Server 2003 with basic volumes using the DiskPart utility. After dynamically extending the LUN size in the storage cabinet, you can use this utility to extend the volume size. See the DiskPart Help on the web for the DiskPart syntax. Diskpart is available as a download utility for Windows 2000 and is included in the product in Windows Server 2003.
You can also use Diskpart on Failover Cluster volumes to dynamically extend volumes with no down time. Here’s a KB that discusses how to use Diskpart on clusters: 304736 How to extend the partition of a cluster shared disk.
You can also use dynamic disks to create spanned volumes, where a volume can be dynamically extended to all another separate physical LUN, and extend the single logical volume over multiple LUN’s.
Note that dynamic disks are not natively provided in the core Windows Server operating system for failover clustering. Support can be added by purchasing the Storage Foundations product by Symantec. Here is a KB article with details: 237853 Dynamic Disk Configuration Unavailable for Server Cluster Disk Resources.
An important distinction between Dynamic Disks and DiskPart is that Diskpart can be used to extend a partition on an already existing LUN where the size of the existing LUN has been increased. Diskpart is not used to span a volume over multiple disks/LUN’s.
Another option is that additional storage capacity can be added and preserve the single name space for users by using volume mount points (also called mounted drives). With mount points, volumes are mounted under directories, such as D:MarketingPresentations. Users access Marketing as they are used to, but the Presentations directory can actually reside on a separate volume/disk. This allows you to increase storage capacity without impact to users.
You can also create volume mount points on clusters, here’s an article that discusses how to do that: 280297 How to configure Volume Mount Points on a clustered server.
I have outlined several ways that you can dynamically increase storage capacity on the fly with no down time today with Windows. I hope you find this helpful.
–Elden
How to extend the partition of a cluster shared disk: MS Q304736 Repost
Source: MS Q304736
This article describes how to add additional storage capacity to a cluster if the underlying hardware RAID supports “capacity extension” technology. Capacity extension provides the ability to add additional drives to an existing RAID set and extend the logical drive so that it appears as free space at the end of the same logical drive. You can use the Diskpart.exe command-line utility to extend an existing partition into free space. This process has the following requirements:
- The additional disk space must appear as free space at the end of the existing drive, and it must be directly behind the existing volume that is to be extended.
- The extension must not rely on software fault tolerance to combine the existing partition and free space.
- The disk signatures of the existing drive remain the same.
- Use of the Physical Disk Resource type for the disk. If the disk resource is provided by a third-party manufacturer, you must contact that manufacturer for information about how to increase disk space.
MPORTANT: If you add an additional drive to an existing array and the new drive appears as a new logical disk (instead of free space at the end of the existing drive), the hardware does not support capacity extension because it refers to the free space as a new drive, and the following procedure will not work. Some storage hardware will, by default, automatically create a new logical disk and volume for the new space despite the fact that the expansion of the existing logical disk is a possible option. When you are using server clusters of Windows Server 2003 or failover clusters of Windows Server 2008 or of Windows Server 2008 R2, software fault tolerance is not natively supported, and the creation of a spanned volume (Volume Set) is not a viable option. To add additional space:
- Create a second physical disk resource.
- Delete and then re-create the array with the additional disk, and then replace the disk by using the instructions that are included in the following Microsoft Knowledge Base article:
How to Extend an Existing Drive into Free Space if the Hardware Supports Capacity Extension
You can perform an online extension or an offline extension of a data volume.
How to perform an online extension of a data volume
You can perform an online extension of a cluster data volume in Windows Server 2008 or in Windows Server 2008 R2 without stopping the cluster application(s). However, not all vendor specific applications, drivers and utilities for Windows Server 2003 fully support transparent online extension of cluster volumes. Therefore, we recommend that you test the specific hardware environment and hardware configuration to confirm that it will behave correctly before you perform the online extension in Windows Server 2003.
To perform an online extension of the disk partition, follow these steps:
- Add the additional physical drives and extend the additional disk or disks as free space by using the instructions that are included with the hardware vendor documentation.
- Open the Disk Management snap-in, verify that the new free space is added to the end of the proper drive.
- Right-click the existing partition, and then click Properties. On the General tab, type a unique name for the partition. This name will be used to identify the partition that you want to extend.
Note If you encounter any problem with the previous steps when you are extending the drive, contact your hardware vendor for assistance.
- Extend the partition by using one of the following methods:
-
Use the Disk Management snap-in in Windows Server 2008 R2
To extend the partition by using the Disk Management snap-in, follow these steps:
- In Disk Management, right-click the data volume that you want to extend.
- Click Extend Volume…. .
- Follow the instructions in the Extend Volume Wizard.
Note Windows Vista and Windows Server 2008 does not allow Disk Management snap-in to Extend volume and user should use diskpart to extend volume instead.
-
Use the Diskpart.exe utility
To extend the partition by using the Diskpart.exe utility, follow these steps:
- Open a command prompt, type diskpart, and then press ENTER.
- At the DISKPART prompt, type list volume , and then press ENTER to display the existing volumes on the computer.
- At the DISKPART prompt, type select volume <volume number>, and then press ENTER. Here volume number is the number of the volume that you want to extend. The volume has the unique name that you created in step 3. The volume is listed in the output of the list volume command.
- At the DISKPART prompt, type extend, and then press ENTER to extend the partition into all of the available disk space to the end of the drive. Or, type extend size=<size> to extends the selected volume by sizemegabytes (MB).
- Type exit, and then press ENTER to exit the command prompt.
-
How to perform an offline extension of a data volume
To perform an offline extension of the disk partition in Windows Server 2003 , follow these steps:
- Back up the shared disk (or disks) that you want to extend.
- Power off all but one node in the cluster.
- Take the entire group that the physical disk resource is located in offline. Bring only the physical disk resource that is to be extended online. This process should close all open handles to the disk.
Note If you have any disk or Host Bus Adapter (HBA) utilities that access the disk, you may need to quit them or stop the services so that they will release any handles to the disk.
- Add the additional physical drives and extend the additional disk or disks as free space by using the instructions that are included with the hardware vendor documentation.
- Open the Disk Management snap-in, verify that the new free space is added to the end of the proper drive.
- Right-click the existing partition, and then click Properties. On the General tab, type a unique name for the partition. This name will be used to identify the partition that you want to extend. Exit Disk Management snap-in.
Note If you encounter any problem with the previous steps when you are extending the drive, contact your hardware vendor for assistance.
- Open a command prompt, type diskpart, and then press ENTER.
- At the DISKPART prompt, type list volume , and then press ENTER to display the existing volumes on the computer.
- At the DISKPART prompt, type select volume <volume number>, and then press ENTER. Here volume number is the number of the volume that you want to extend. The volume has the unique name that you created in step 6. The volume is listed in the output of the list volume command.
- At the DISKPART prompt, type extend, and then press ENTER to extend the partition into all of the available disk space to the end of the drive. Or, type extend size=<size> to extends the selected volume by size megabytes (MB).
- Type exit, and then press ENTER to exit the command prompt.
- Now that the volume is extended, you can bring the entire group that contains the physical disk resource online, and then power up all of the other nodes in the cluster.
- Verify that the group can come online and failover to all other nodes in the cluster.

What a wonderful article this is! With detailed and complete explaination of extending volume in diff situations or using diff Windows built-in tools. God, i love it! Yet, Windows built-in tools are powerful, however, it still has limitations and this give chance for third-party software. There are many such kinds, say Partition Assistant (http://www.extend-partition.com/), etc. So, what i want to say is make best use of your Windows tools and if they fails or aren’t satisfy you, third-party software can be your consideration.
LikeLike